Cards

About Us

Thursday, December 23, 2010

Cricut + Fabric = cheap cute stockings!

We aren't living in a permanant situation right now, and our family is still too young to make stockings that will be cute and that I want to last forever so this year I bought 3 stockings at the dollar store and decided to make my own temporary stockings. I ironed on the fusible interfacing to the fabric and then cut the names out on the cricut and ironed them on. This took me all of 30 min from start to finish and I'm so glad I have something temporary and cute! (scooter is the name of our dog, we wouldn't do that to a child! )

Tuesday, October 12, 2010

Wedding Card

Here is a wedding card I made using the MS punch and the Wedding/Marriage cart. I love the white on white cards. I used some clear embossing powder on the top heart to give it that special bling touch.


Here is the inside. I also used the clear embossing powder to help the words pop.

It's a Party on the Card

I work with a wonderful tech guy in Atlanta who helps me out all the time. He has become a good friend and his birthday gives me an excuse to really thank him for his extra efforts with me and my merchants. Anyway, below is his birthday card. He is getting married a few days after his birthday so I wrote in the card that with the wedding coming up he was turning into a monster and so just wanted to invite a few of his friends to the party!
Here is a left side view, mostly done using mini monsters cart. The number 29 is from the Robotz cart and the Happy Birthday is from Create A Critter.
Here is a right side shot... Got'a love the glitter! Isn't it all about the bling!

Deal Pickle

My SIL's first day on the job with a company called Deal Pickle, a new soon to be live website we are all excited about for discount coupons. My DD came over in the morning and said she wanted to make a card to take to her husband. So this is what we came up with. She later text me to say one of the owners wants to buy a Cricut!! Pretty funny...

Here is the inside of the card. It is a phrase from Graphically Speaking Cart. I just loved the glitter paper on this. It just makes the card pop!

Sympathy Card - Cats

We got news a few night ago that my MIL's neighbor, Mary Lou passed away suddenly. She loved cats and we would often hear stories about them from my MIL. She was my MIL's walking companion. they would go walking every day for a mile. MaryLou was a wonderful friend and support to my MIL.

I found these cats on the A Childs Year cart and used my G to weld them to this fun frame. The paper is from SEI. It is really beautiful paper and the photo just doesn't give this card justice.

Here is the inside of the card.

Bird House - Welcome Home

Here is a card for my daughter welcoming her back to Salt Lake City. I had fun using the bird from Home Decor. I think it is my favorite bird PC has created. The bird house and green leaf behind are from the Cindy Loo cart.

Crowned with Glory

I have been sending cards to my daughter who lived in Idaho, but last weekend she moved near me so she will just have to come see me now! I am so glad to have her close by. This card was created using the Summer Vacation cart. I used Cri-Kits gel pens in my Cricut to draw the words inside the card.


Here is the inside with the gel pens.

Card Night!

I got together with a couple of girlfriends for a card night last week.  We certainly have a good time when we do this!  They humor me in my home-life rantings. We sympathize over pregnancies--the belly aches thereof and excitement of adding another bundle of joy to the family. There is usually some mention of husbands in the conversation. Giggles. Rolling of eyes. Laughter. And then the "ooohs and aaahhs" as the cards come together. 

The theme this time was seasonal miscellaneous.  That meant the sky was the limit!

Here is Rebecca's autumn card.  I'm so glad she used the SYI leaf silhouette! It is a favorite and I was hoping to find a good way to use it.  She also taught us a couple of fun distressing techniques. Thanks Rebecca!


My Christmas card: (the outside) I was thinking of New York City when I created this card.  Modern, weathered, yet traditional.  I don't know if I captured it, but I certainly put in plenty of elements!
The inside.

Rebecca's Halloween card. I liked her tri-fold idea and how she brought it together with the sleeve.  My little girl liked all the sparkles! It seems I make a Halloween card at least once a year and I can see this one will work perfectly! (That is, if I can muster up giving it away!)


Both of Katrina's cards are so elegant!  I would love to make a hundred of these and give them to all my dear friends and family.
The pearls in the deer's antlers were so pretty!
Here is Katrina's second card. I have a difficult time deciding which one I like better. This one is very classy too!  It was my first time using fabric other than ribbon in a card and I fell in love immediately.


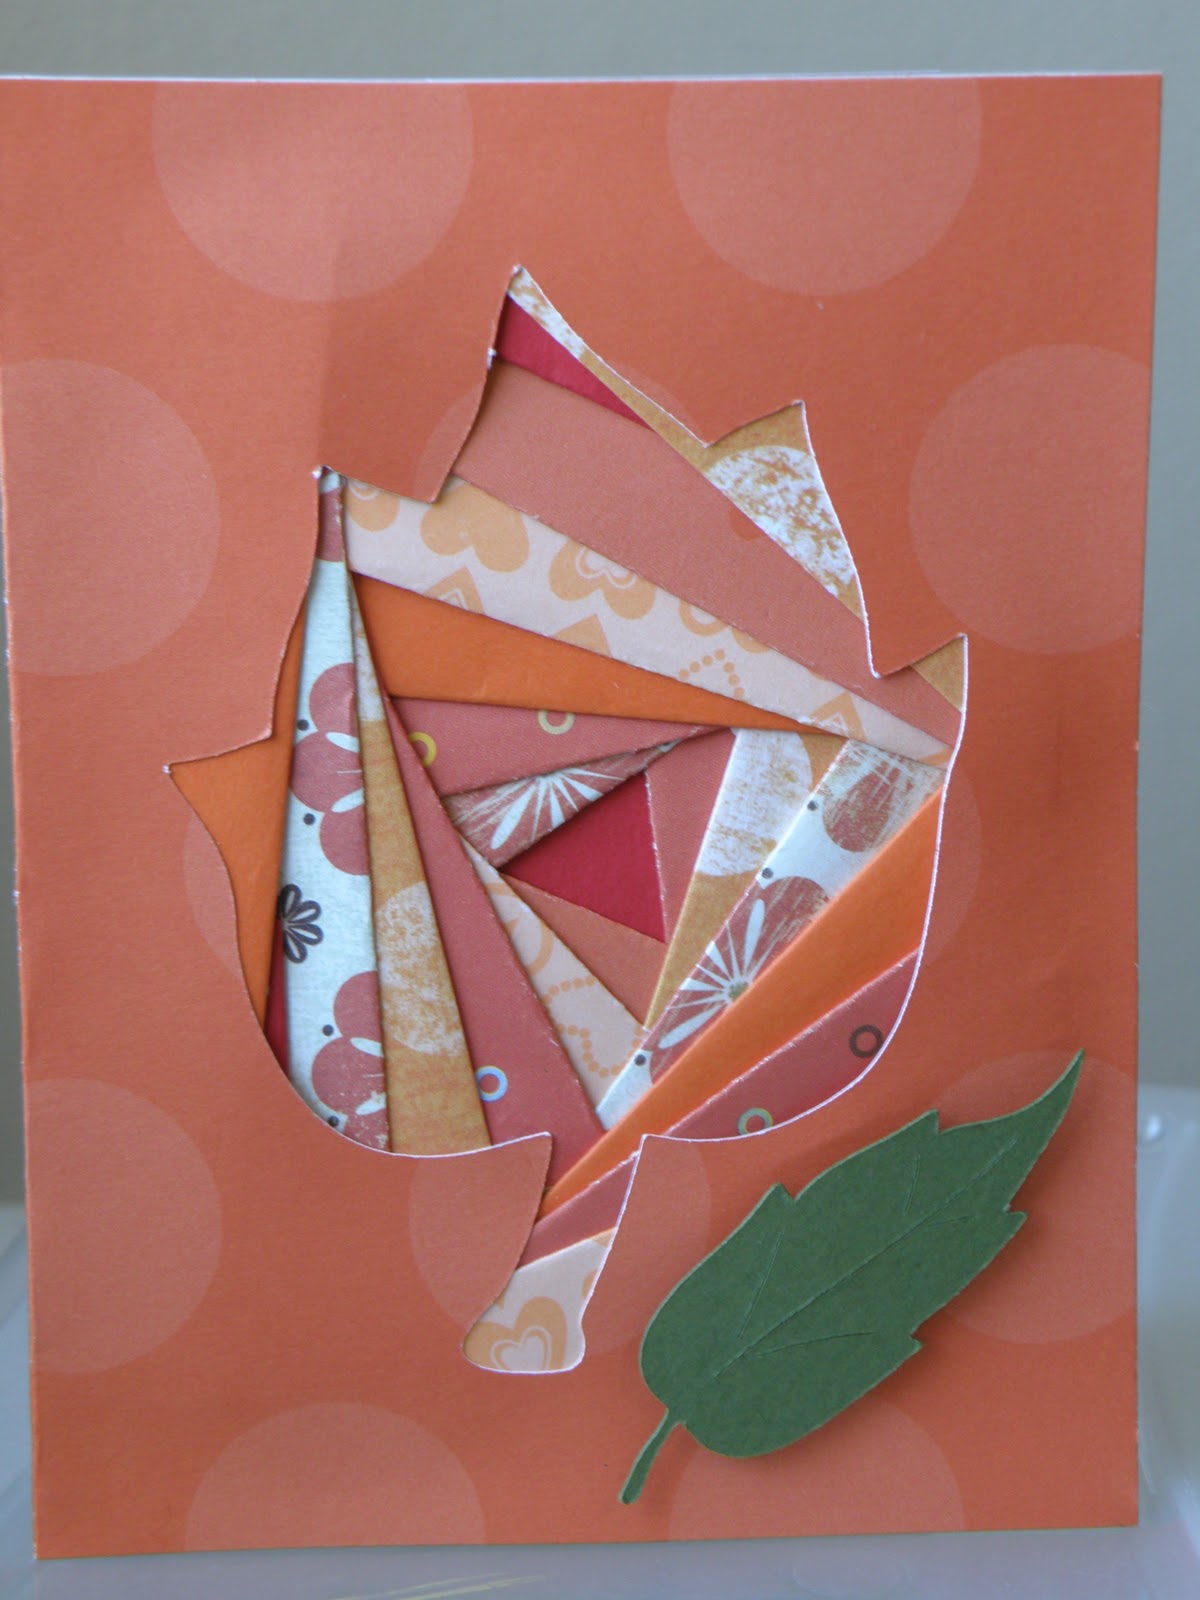
Here is my second card. I went with an autumn theme and really wanted to learn something new. This particular technique is called "Iris Folding" It was my first time doing it and I definitely learned a few things along the way.  I will post a future blog with a tutorial to show you how to do it.  Unfortunately, I ran out of time when I was preparing for this card, so I feel like it is missing elements, but nonetheless, it was fun to try! (Thank you to my sweet friends who humored me with this card!)

The inside.

Baptism Card

My nephew just got baptized so my kids and I put this card together to send to him.  We are so proud of him and wished we could have been there!


His dad was the one who baptized him, so that is why there are two people. We used velum paper to be the water.

Looking back now, I wish I would have used a gel pen to "cut in" their faces.  They look so bland!  They must have looked better in real life because I mailed it off just like this!


Here's the inside.


Autumn Wedding

I made this for my brother-in-law and his new bride. I love the square cards that SYI has! The brown paper with the creme, classic laid embossed paper made it look so elegant (and a perfect match for the autumn season). The bow got a little off kilter after being in the envelope, but I wanted to catch a picture of this card before we gave it to them. 

Sunday, September 19, 2010

Birthday Purse

My daughter-in-law celebrates her birthday today. I wanted to make her something different so I thought of a purse instead of a card. This purse was cut from Forever Young at 4 inches. It is great the way it doesn't need any glueing. I added a bunch of bling and a fun flower on the outside to dress it up.
Inside is a Happy Birthday stamp from SU and a lot of BLING! The base of the purse was perfect to add a "little" something special. Don't us girls always say we like small packages!

Close up of the Happy Birthday embellishment.

Mother's Birthday Card

Friday was my mother's 84th birthday. Maybe I shouldn't say that because now you can guess how old I am! Here is a card I made for her using Stretch Your Imagination cartridge. I cut three of the paisley patterns out and popped some of them, added some tulle and gold rope.
Below is the inside of the card with gold embossing powder.

Have a SWEET Day!

This is a new technique for me. I went to the Scrapbook USA show recently and there was a company called Cri-Kits that has a great system for writing instead of cutting on the cricut. I got out my Gypsy and welded the Cafe (shadow) cut from My Community cart together on one page and on the second page placed the Cafe cut where it would be aligned with the cut. First I put in my black pen in the holder and replaced it with the Cricut cutting blade housing. I "cut" the face of the Cafe with the pen. Then I replaced my cutting blade back into the Cricut and cut the shadow Cafe cut. It was so easy and simple. Some of the Cricut cuts have a lot of detail and you don't want the cuts, you want the outline. This is a great solution. I like the thin pen lines over the Cricut felt tip pens in this case.
The little girl cut is from A Child's Year. Another cute cut would have been the couple sitting at the Cafe table in the Tie the Knot cartridge.
On the inside of the card is computer generated.

Thinking of you...

So I went to Scrapbook USA last week and found a company called Cri-Kits. They were selling both pens and embossing pens and pad for the Cricut. I succumbed! Here is a sample of the embossing on Vellum. The design is from Cindy Loo cartridge. Go check out www.Cri-Kits.com website and you can see tutorials on how to create fun designs by embossing instead of cutting.
The flower paper is from SEI "Bissette" collection. I picked up some great SEI paper at the scrapbook fair that I am very excited about. You can't see in the picture, but the flower paper has great sparkles and shine that is a nice contrast with the flat vellum. The ribbon is from SU.

Hello!

Here is a card I sent to my daughter who lives in Idaho. She usually text or calls and says, "Mom, I got your card today." But the week went by and no call about the card. I called her and said, "Did you get my card?" and she said no. Hmmmm... the only thing I could think of was the USPS wanted more postage and was sending it back... sure enough I got the card back, but it wasn't for more postage, it said the address was insufficient! Well it is the same address I always put so not sure what was "insufficient". I had even put the last 4 numbers of the zip code. Oh well....
This is from the Wall Decor cartridge. I covered up the holes with buttons.
The paper is from SU.
Here is the inside.

Tuesday, August 31, 2010

Belated Birthday Card

It was my SIL's birthday in early August. All our family except him came and it was a crazy time. He had to stay home as he is a Pathologist and had a rotation in St. Louis he couldn't miss. So after everyone left I realized he didn't get a birthday card from us. The card was made from Mini Monsters. I am sorry you can't see the head is popped and the eyes are sunken. I used the MS drippy punch on the side and also inside. In our family we also like to put our arms out and say,"I love you this much". Our grandchildren are really good at it! So my dear SIL, I hope you know we love you "THIS MUCH"!

Here is the inside of the card. A little orange gave it a great pop!
The font is that bloody one. Pretty fun stuff!
Posted by Picasa

Thinking of You - Fruit

Sometimes we all need a "pick me up" card. I sent these to me DD's. They do so much and are so busy, I just wanted them to know there is sweetness at the end of the day with all their accomplishments. The card is simple with a SU stamp from "Fruit Stand" stamps. I used some Lasting Impressions paper and a bit of ribbon to tie it together.
For the inside of the card I was in a store and saw this saying. I just loved what it said.
Posted by Picasa

Get Well Soon

A friend in the neighborhood had surgery and this was a simple card I made for her. I used the Serenade cartridge for the flowers and leaves. A MS punch was used along the bottom of the card.

This is the inside. I used a SU stamp for the square and saying.
Posted by Picasa